The greatest mistake in Highland photography is waiting for the sun; the region’s true dramatic character is revealed in its overcast, moody weather.
- Embrace the “Silver Hour”—the soft, diffused light on wet surfaces—over the clichéd Golden Hour for unique, ethereal shots.
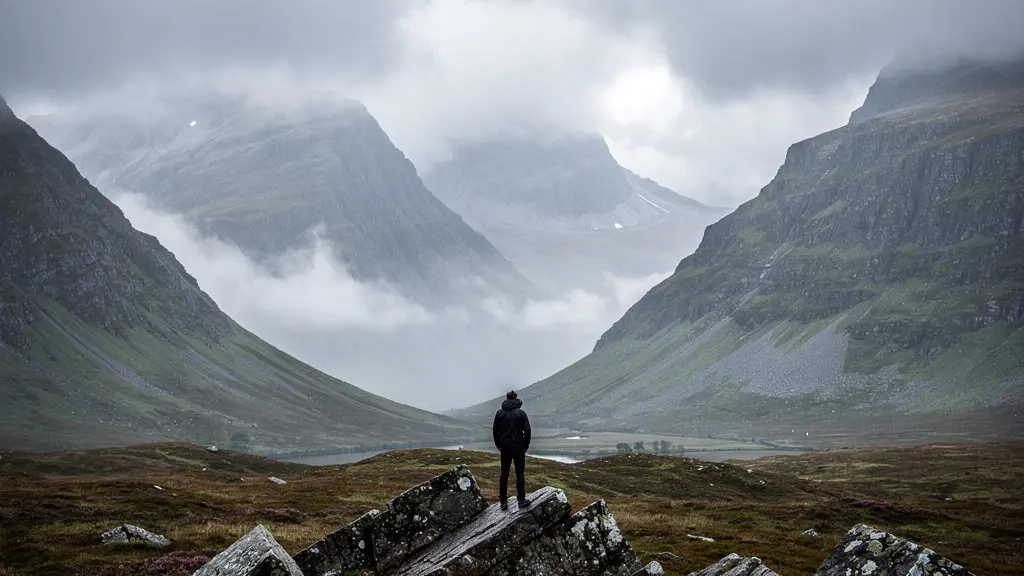
- Use mist and low clouds as compositional tools to create atmospheric depth and emphasize scale, rather than seeing them as obstacles.
Recommendation: Stop fighting the weather and start using it. Master techniques for shooting in the rain and mist to unlock the powerful, soulful images that sunny days can never provide.
You’ve made the pilgrimage. You’re standing at the foot of Glencoe, camera in hand, ready to capture the epic landscapes you’ve seen in a hundred photographs. But instead of majestic sunbeams piercing the clouds, you’re met with a blanket of flat, featureless grey. The rain starts. It’s a familiar story for any photographer visiting the Scottish Highlands, a frustration that often leads to disappointment and a memory card full of uninspired images. The common advice is to wait for a gap in the clouds, or the default fallback: “just convert it to black and white.” Some might even suggest packing up and heading to a forest or waterfall, abandoning the grand vista entirely.
But what if that advice is fundamentally wrong? What if the very thing you see as a problem—the brooding, overcast sky, the persistent drizzle—is actually the key to unlocking the true soul of the Highlands? The secret isn’t in fighting the weather, but in understanding and embracing it. It’s about trading the fleeting, often harsh, Golden Hour for what I call the “Silver Hour”: that magical period when soft, diffused light kisses wet rock, glistening heather, and dark lochs, creating a mood and texture that sunshine simply washes away. This isn’t about salvaging a shoot; it’s about seeking out these conditions for their unique photographic potential.
This guide is built on decades of experience shooting in the Highlands, in all weather. We’re going to move beyond the basics of keeping your camera dry and dive into the specific techniques that turn a ‘bad weather day’ into your most productive one. We will explore how to use mist to create depth, why your rain cover is your most important lens, and how a deep respect for the mountain’s hazards is the first step to capturing its beauty. Prepare to change your entire perspective on what makes a great landscape photograph.
In this comprehensive guide, we’ll break down everything you need to know, from understanding the unique qualities of Highland light to the essential safety protocols for shooting in the mountains. This structured approach will give you the confidence and skills to create stunning images, no matter what the sky looks like.
Summary: A Practical Guide to Photographing the Scottish Highlands in Overcast Conditions
- Why the Golden Hour in the Highlands Lasts Longer in Winter Months?
- Best Camera Rain Covers: Which One Survives a Highland Downpour?
- How to Use Negative Space to Emphasize Scale in Glencoe Valley?
- The Composition Error That Ruins 80% of Loch Ness Photos
- 3 Hidden Locations in the Isle of Skye for Dawn Photography
- Protecting Gear From Salt Spray: The Maintenance Routine You Cannot Skip
- Mountain Weather Hazards: When to Abandon a Shoot for Safety?
- How to Photograph Long Exposure Seascapes on Scotland’s Dangerous Coasts?
Why the Golden Hour in the Highlands Lasts Longer in Winter Months?
It’s true that the low trajectory of the winter sun extends the ‘Golden Hour’ in the Highlands. The sun hangs near the horizon for what feels like an eternity, offering a prolonged period of warm, directional light. But focusing only on this overlooks the more prevalent and, I’d argue, more potent opportunity: the Silver Hour. On an overcast day, the clouds act as a giant softbox, creating a diffused, even light that eliminates harsh shadows and allows the landscape’s subtle colours and textures to emerge. This is especially powerful in winter when the land is damp.
This “bad” light is what activates the landscape. Wet rocks turn from dull grey to deep, rich slate with a silver sheen. Heather, bracken, and moss become saturated with colour. This is the time to hunt for water-activated textures. As photographer Dean Allan notes when discussing the area, iconic locations are places “imbued with history, atmosphere, and inspiration” that reveal entirely different qualities under varied conditions. The extended twilight of winter isn’t just about a longer sunset; it’s about a longer window for this moody, atmospheric light to work its magic. Chasing the sun is a tourist’s game; a photographer’s job is to master the light you’re given, and in the Highlands, that is most often the soft, silvery gift of an overcast sky.
To truly harness this, you need to shift your mindset and technique. Look for backlighting on wet surfaces, use a polariser sparingly to manage reflections without killing them entirely, and bracket your exposures to capture the full dynamic range of glistening highlights and deep, saturated shadows. This is when the Highlands truly come alive.
Ultimately, while the winter golden hour is a bonus, the real prize is the vast amount of time you have to work with the soft, dramatic light that defines the region. Mastering this is the key to unique Highland photography.
Best Camera Rain Covers: Which One Survives a Highland Downpour?
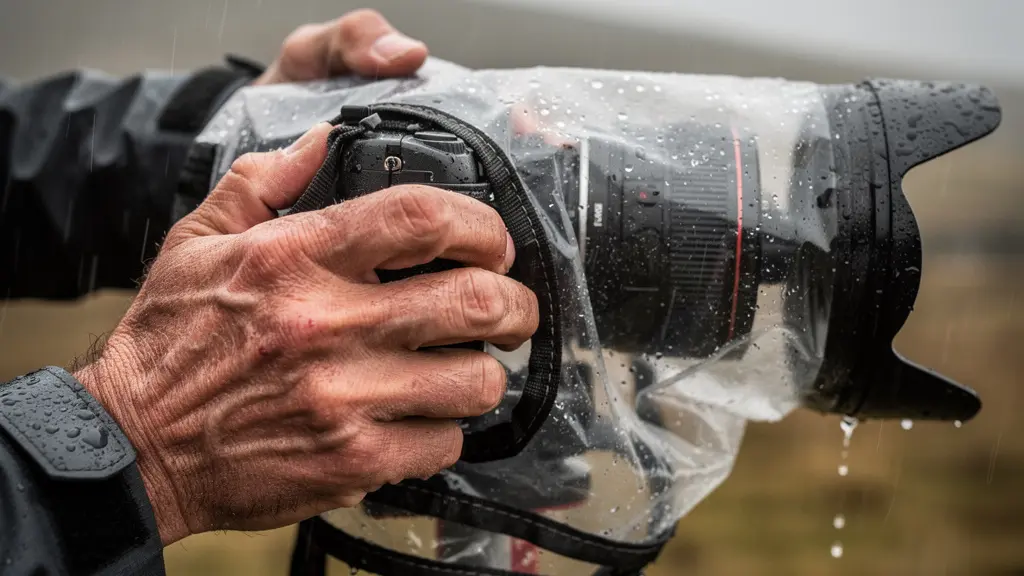
Let’s get one thing straight: your ‘weather-sealed’ camera is not waterproof. A proper Highland downpour, driven by a 40mph wind, will find every weakness in your gear. Your rain cover isn’t just an accessory; it’s as essential as your lens. Choosing the right one is the difference between getting the shot and a very expensive repair bill. Forget the flimsy, poncho-style covers; they act like sails in the wind and offer poor access to controls. They’re a last resort, not a primary tool.
A professional-grade rain sleeve is the minimum standard. These are designed with sealed armholes that let you operate the camera controls effectively while keeping water out. Crucially, they have a clear, anti-fog window for the viewfinder and LCD screen, and drawstrings to cinch tight around the lens hood and eyepiece, preventing wind from driving rain inside. While a dedicated hard-shell housing offers the ultimate protection (IPX8), its bulk and weight make it impractical for long treks into the mountains. For most landscape work, a high-quality sleeve is the perfect balance of protection, usability, and portability.
This close-up view shows the reality of protecting your gear. Your hands will be cold and wet, so a cover that’s easy to manipulate is critical. Notice the secure fit around the lens hood, which is non-negotiable.
The table below, based on extensive field testing, breaks down the real-world performance of different cover types in Highland conditions. Your choice should be based on your commitment to shooting in heavy weather. If you’re serious, invest in a professional sleeve. The DIY freezer bag and gaffer tape method can work in a pinch, but it’s a risky gamble with thousands of pounds worth of equipment.
This comparative analysis provides a clear overview of your options for protecting your gear from the elements. A professional rain sleeve consistently offers the best blend of protection and usability for the demanding conditions of the Scottish Highlands.
| Cover Type | Waterproof Rating | Control Access | Viewfinder Visibility | Highland Wind Resistance |
|---|---|---|---|---|
| Professional Rain Sleeve | IPX6 | Full access via sealed arm holes | Clear window with anti-fog coating | Excellent with drawstrings |
| Emergency Poncho Style | IPX4 | Limited through plastic | Poor in heavy rain | Poor – acts as sail |
| DIY Freezer Bag Solution | IPX3 | Custom cut openings | Clear if using quality bags | Good with gaffer tape |
| Dedicated Housing | IPX8 | Full but bulky | Excellent | Excellent but heavy |
Remember, the best camera is the one that works. Protecting it from the elements is the first and most important step in capturing the dramatic scenes that only come with “bad” weather.
How to Use Negative Space to Emphasize Scale in Glencoe Valley?
“Photographing iconic locations like those in the Highlands is not about seeking validation or perfection—it’s about seizing moments, telling stories, and celebrating nature’s stunning artistry”
– Dean Allan, Dean Allan Photography – Scottish Highlands Guide
This sentiment is the key to composition in a place as vast as Glencoe. Many photographers try to cram everything into the frame—every peak, every river bend, every cloud. The result is often a chaotic image with no clear subject. The real art lies in using what isn’t there to define what is. In the Highlands, negative space is rarely empty blue sky; it’s the thick, swirling mist and low-hanging cloud that defines the landscape. This weather is your most powerful compositional tool for conveying scale and mood.
Instead of waiting for the mist to clear, use it. When a cloud hangs in a glen, it isolates the peaks, turning them into majestic islands in a sea of white. This is atmospheric separation. The mist simplifies the scene, removing distracting background details and forcing the viewer’s eye to the elements you want to highlight. A lone, ancient pine tree emerging from the fog feels more immense and solitary than one on a busy, sunlit hillside. Weather data confirms this is a regular opportunity; for photographers, it’s a near certainty that on 72% of days, you can expect low-hanging clouds below 800m, which are ideal for creating this effect.
To use this effectively, compose your shot around the interaction between land and mist. Frame a mountain so that its base is obscured, making it seem as if it plunges into an infinite abyss. Position yourself so that the fog acts as a soft, bright backdrop to a dark, textured foreground of rock or heather. This contrast creates immense depth and drama. You’re not just taking a picture of a mountain; you’re telling a story about its resilience and mystery, using the weather as your co-author.
Stop seeing the mist as an obstruction. It is your canvas. It is the negative space that gives your subject its power and its place in the grand scale of the Highlands.
The Composition Error That Ruins 80% of Loch Ness Photos
The single biggest compositional error at Loch Ness—and many other famous lochs—is shooting from eye-level at the designated viewpoint or car park. This perspective, while convenient, is the absolute worst for capturing the scale and mystery of the location. It results in a flat, two-dimensional image: a band of water in the middle, a band of land at the back, and a band of sky at the top. It’s a boring, static postcard shot that completely fails to convey the immense depth and layered nature of the Great Glen.
The solution is to break this horizontal symmetry by introducing a strong foreground and changing your elevation. Never take the easy shot. Instead, get low to the water’s edge to use weathered rocks or gnarled Caledonian pine roots as a powerful anchor in the foreground. This immediately creates a sense of depth, leading the viewer’s eye into the scene. Alternatively, gain some height. From an elevated position, you can use a telephoto lens (70-200mm range) to compress the scene. This telephoto compression is a game-changer; it makes the distant mountains on the far shore appear larger and stacks them into distinct layers, especially when there’s a bit of mist or haze to create that crucial atmospheric separation.
The image below demonstrates this perfectly. Instead of a wide, empty expanse of water, telephoto compression brings the layers of the landscape together, with the mist creating separation and a profound sense of depth and mood.

The key is to think in three dimensions: foreground, midground, and background. The classic tourist shot only has a midground and background. By deliberately finding a strong foreground element within a few metres of your camera, and by using elevation and compression to manage the background, you transform a flat snapshot into a dynamic, layered landscape photograph that tells a story of age and scale. The following steps are a non-negotiable routine for avoiding the cliché:
- Never shoot from standard viewing points at eye-level. Immediately move higher or lower to change the perspective.
- Always include a strong foreground element, like weathered roots or stones, within 3 meters of your camera position to act as an anchor.
- Use telephoto compression (a 70-200mm lens is ideal) from an elevated position to stack the far shore and mountains into layers.
- Wait for mist or morning haze. This isn’t a nuisance; it’s a vital ingredient for adding atmospheric separation between the water and the mountains.
Avoid the trap of the easy view. The best images of Loch Ness are found by turning your back on the lay-by and exploring the shoreline and hillsides for a unique perspective.
3 Hidden Locations in the Isle of Skye for Dawn Photography
I’m not going to give you a list of three specific GPS coordinates for dawn photography on Skye. Why? Because by the time you read this, they won’t be hidden anymore. The true secret to finding unique locations, especially on a photo-saturated island like Skye, isn’t about following someone else’s list. It’s about learning the method to discover your own. The most rewarding shots come from your own exploration, not from queuing up at a famous spot like the Old Man of Storr or the Quiraing.
The first step is to trade Google Maps for an Ordnance Survey (OS) map. Look for the small, unnamed lochans (small lochs) away from the main roads, especially on the Trotternish or Waternish peninsulas. Cross-reference their location with a photographer’s ephemeris app to see how the dawn light will strike the surrounding terrain. This is how you find your own personal reflection shot, away from the crowds. As one guide on finding alternative spots puts it, “Expert guides with deep knowledge of the area will lead you to hidden gems and iconic locations,” but that ‘guide’ can be your own map-reading skill. The method reveals places like coastal stacks only visible at specific tides or unique approaches to famous landmarks that offer a fresh perspective.
The second part of the method is embracing the Highland dawn schedule. In the depths of winter, you have a huge advantage. According to seasonal photography data for Skye, the winter dawn can occur as late as 8:45 AM, which gives you nearly 2.5 hours of optimal, soft light to work with. This is a civilized start time that allows you to hike to a pre-scouted location in the twilight without a ridiculously early alarm. Use this generous window of light to explore around your chosen area, finding different compositions as the light evolves. The best location is often 100 metres to the left or right of the obvious one.
So, the three “hidden locations” are not places, but principles: 1. Master map-reading to find what others overlook. 2. Use the late winter dawn to your advantage. 3. Explore around your chosen spot, don’t just plant your tripod. This is how you’ll come home with images that are truly your own.
Protecting Gear From Salt Spray: The Maintenance Routine You Cannot Skip
If you think a Highland downpour is tough on your gear, wait until you experience a coastal gale. The air itself becomes a corrosive mist of saltwater that works its way into every crevice of your camera, lens, and tripod. A single coastal shoot without a rigorous cleaning routine afterwards can cause permanent damage, seizing up zoom rings, corroding electronic contacts, and rusting tripod leg locks. This maintenance isn’t optional; it is the price of admission for capturing dramatic seascapes.
The process begins the moment you finish shooting. Before you even get back in your car, your first priority is to wipe down the entire exterior of your camera, lenses, and tripod with a microfibre cloth dampened with fresh water. This neutralises the salt immediately. The biggest mistake is putting the gear away “to clean later.” By then, the corrosion has already begun. Furthermore, you must prevent condensation. When you move from the cold, damp coast into a warm car or building, seal your gear inside an airtight bag. This allows the equipment to warm up gradually without moisture from the warm air condensing on and inside its cold surfaces.
Within 48 hours, a deeper clean is mandatory. This involves carefully cleaning the metal lens mounts on both the camera body and the lenses with an isopropyl alcohol wipe to ensure a clean electronic connection. For your tripod, this is the time for a full breakdown. Disassemble the leg sections, rinse every component with fresh water to remove salt and sand, dry them thoroughly, and re-lubricate the threads with a small amount of silicone lubricant before reassembly. Ignoring this will lead to seized legs, turning your expensive carbon fibre tripod into a monopod.
This routine may seem tedious, but it is the fundamental discipline of a serious landscape photographer. It is the difference between an amateur whose gear fails and a professional who can rely on their tools in the harshest conditions on Earth.
Mountain Weather Hazards: When to Abandon a Shoot for Safety?
The mountain doesn’t care about your photograph. It has stood for millennia and will be there long after you are gone. The single most important skill for a Highland photographer is not composition or mastering light; it’s knowing when to turn back. The pursuit of a dramatic shot can create a dangerous tunnel vision, causing you to ignore warning signs until it’s too late. The weather in the Scottish mountains can change with terrifying speed, and a beautiful, moody scene can become a life-threatening situation in minutes.
Your “Go/No-Go” decision must be based on objective data, not just ambition. Check the Mountain Weather Information Service (MWIS) before you even leave. Pay close attention to wind speed, visibility, and wind chill. For instance, MWIS data indicates that wind speeds above 60mph occur on 89 days annually on summits above 3000ft. In such conditions, it is nearly impossible to stand, let alone operate a camera safely. A tripod becomes a dangerous kite. These are not conditions for photography; they are conditions for survival.
This image captures that critical moment of choice. The path to safety is clear, but the allure of the dramatic, approaching storm is strong. The correct decision is always the one that gets you home.
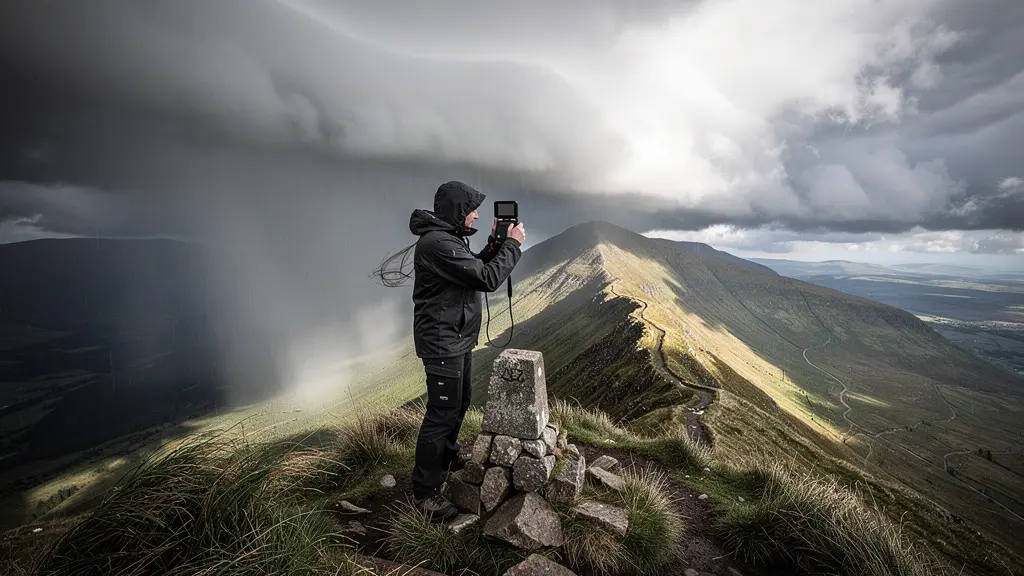
Pride has no place on the mountain. There is no shame in abandoning a shoot. In fact, it is a sign of an experienced mountaineer and photographer. Having a clear, pre-defined set of rules removes emotion from the decision, which can be the difference between a great story and a tragic headline.
Your Go/No-Go Decision Matrix for Highland Shoots
- Cloud base below 600m combined with visibility under 100m: Abort the ascent immediately. Disorientation is a primary killer.
- Wind chill forecasted below -15°C with any form of precipitation: Do not proceed above 2000ft. Hypothermia risk is extreme.
- Lightning detected within 10 miles (using a weather app or detector): Descend to your vehicle or a shelter immediately.
- A river crossing on your route is above knee height and fast-flowing: Do not attempt to cross. Find an alternative or cancel the shoot.
- Remaining daylight is less than your planned return time plus a 90-minute safety buffer: Turn back now, without negotiation.
No photograph is worth your life. The mountain will still be there tomorrow. Make sure you are too.
Key takeaways
- Ditch the “Golden Hour” obsession and master the “Silver Hour” by using overcast light on wet surfaces to create unique, moody images.
- Treat “bad” weather as a compositional tool: use mist for atmospheric depth, rain for reflective textures, and wind for dramatic motion.
- Your safety and the maintenance of your gear are paramount. A rigorous, non-negotiable approach to both is the mark of a true professional.
How to Photograph Long Exposure Seascapes on Scotland’s Dangerous Coasts?
Photographing the violent energy of the Scottish coastline, from the tidal races of the Pentland Firth to the basalt columns of the Hebrides, requires more than just a 10-stop ND filter. It demands a deep understanding of tides, wave patterns, and a specific set of techniques to translate that raw power into a compelling image. Simply smoothing the water into a milky haze often robs the scene of its drama. The art is in choosing a shutter speed that matches the story you want to tell.
As photographers working in Scotland’s northern waters know, the technique involves shutter speed bracketing. For an explosive scene with spray crashing against rocks, a faster shutter speed of 1/10s to 1/4s is needed to freeze the texture and detail in the water. To show the powerful motion of a receding wave, a speed of 0.5s to 2s will create leading lines of white water. It’s only for creating an ethereal, misty effect that you should venture into the 15-30 second range, and this is often most effective on a falling tide when the energy is subsiding. The locations mentioned in a study of Scotland’s iconic coasts, such as Torridon and Skye, have drawn artists for centuries because their shorelines offer opportunities for all these approaches.
However, technique is useless without an understanding of the tide. The character of the sea changes dramatically with the tidal state, and your safety depends on knowing what’s coming. A rising mid-tide might offer the most dynamic wave action, but it’s also when you’re most at risk of being cut off. High tide peak is often the most dangerous, with powerful surges. Always shoot on a falling tide if you are unfamiliar with a location.
The following table provides a general guide for shooting different tidal states around Scotland’s coasts, but always supplement it with local tide charts and on-site observation before setting up your tripod.
| Tide State | Best Locations | Optimal Shutter Speed | Visual Effect | Safety Rating |
|---|---|---|---|---|
| Low Tide -2 hours | Outer Hebrides beaches | 2-4 seconds | Rock pool reflections | Safe |
| Rising Mid-Tide | Duncansby Stacks | 0.5-1 second | Wave motion trails | Moderate caution |
| High Tide Peak | Neist Point | 1/10 – 1/4 second | Explosive spray capture | Dangerous |
| Falling Tide +1 hour | Shetland coasts | 15-30 seconds | Misty water effect | Safe with care |
Start by observing. Watch the rhythm of the waves for at least 15 minutes before you even take your camera out. Identify the patterns, choose your shutter speed with intent, and always, always have a clear escape route planned.