Your photos make the fells look flat because you’re shooting like a tourist. To capture their true scale, you must think and work like a mountaineer.
- Ditch the wide-angle cliché; use telephoto lens compression to stack mountain layers and create depth.
- Master exposure bracketing to control the extreme light contrast between bright skies and dark valleys.
- Accept that the most powerful shots are earned through physical effort and carrying the right gear to difficult places.
Recommendation: Prioritize a 70-200mm lens and a lightweight tripod on your next fell walk. The weight is an investment in dramatic, powerful images.
You stand on a hard-won summit, the vast, serrated landscape of the Lake District unfolding before you. You raise your camera, frame the shot, and click. But when you look at the screen, the epic vista has vanished. The towering fells have collapsed into a flat, green and grey band, the sense of immense scale and depth utterly lost. This is the classic frustration for the hiker with a camera: your images fail to convey the feeling of actually being there. The problem isn’t the landscape; it’s the approach.
Many guides will tell you to use a wide-angle lens and wait for the golden hour. While not bad advice, it’s incomplete and often leads to the very flatness you’re trying to avoid. Capturing the raw power of the fells isn’t about simply documenting a view. It’s a technical and physical battle against the two-dimensional nature of photography itself. It’s about making deliberate choices that force perspective, control chaotic light, and embrace the wild character of the mountains.
The secret is to move beyond the postcard and adopt the mindset of a mountaineer-photographer. This means understanding that a great mountain photograph is earned, not just taken. It’s earned through effort, planning, and a deeper understanding of optical physics and compositional weight.
This guide will deconstruct the techniques required to translate that breathtaking, three-dimensional reality into a powerful two-dimensional image. We will explore how to manipulate perspective, manage extreme dynamic range, and make the crucial gear and location choices that separate a simple snapshot from a truly epic landscape photograph.
Summary: A Mountaineer’s Guide to Epic Fell Photography
- Telephoto Compression: Why You Should Shoot Landscapes With a Zoom Lens?
- Bracketing Exposures: How to Balance Bright Skies and Dark Valleys?
- The Fitness Reality: Carrying a Tripod Up Scafell Pike?
- Wastwater vs Windermere: Which Lake Offers the Most Dramatic Reflections?
- Mountain Weather Hazards: When to Abandon a Shoot for Safety?
- Why British Cities Look Better in High Contrast Black and White?
- How to Use Negative Space to Emphasize Scale in Glencoe Valley?
- How to Sequence a British Landscape Portfolio to Impress Editors?
Telephoto Compression: Why You Should Shoot Landscapes With a Zoom Lens?
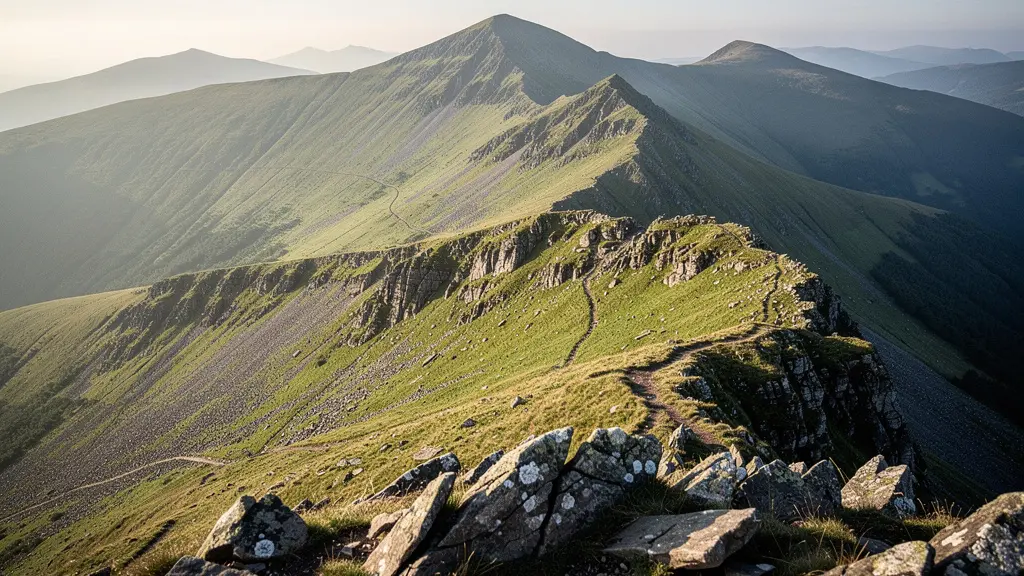
The first instinct for landscape photography is to reach for a wide-angle lens, to “get it all in.” This is often a mistake in the fells. A wide-angle lens exaggerates the foreground and pushes the background away, shrinking those distant, epic peaks into insignificance. The key to conveying scale and depth is to reverse this logic. You need to bring the background forward, and for that, you need a telephoto lens and the power of lens compression.
Compression is an optical effect where a long focal length (e.g., 70-200mm or more) appears to stack distant elements on top of each other. A ridgeline miles away will appear closer and larger relative to a ridgeline in the mid-ground. This is how you create a sense of a vast, layered world. Instead of one flat green wall, you get multiple, distinct layers of fell, each with its own light and shadow, creating a profound sense of depth.
To achieve this, you must physically distance yourself from your subject. Find a vantage point far from the scene you want to capture. Use the zoom to isolate a specific composition within the broader landscape—a farmhouse nestled between two pikes, a winding road climbing through a pass, or the repeating triangular patterns of distant peaks. The goal is no longer to capture everything, but to capture a compelling story *within* the landscape. By focusing on these relationships between layers, you create images with immense compositional weight and scale.
This deliberate exclusion of the immediate foreground forces the viewer’s eye into the heart of the fells, emphasizing their layered complexity rather than the patch of grass at your feet.
Bracketing Exposures: How to Balance Bright Skies and Dark Valleys?
The Lake District light is notoriously challenging. One moment, a brilliant sunbeam illuminates a fellside; the next, it’s vanished, leaving a deep, dark valley under a bright, cloud-filled sky. Your camera’s sensor cannot possibly capture this immense difference in brightness—the dynamic range—in a single shot. The result is a classic photographic failure: either a perfectly exposed sky with a completely black, detail-less valley, or a properly exposed valley with a blown-out, pure white sky.
The professional solution is not to compromise, but to capture all the light using a technique called exposure bracketing. This involves taking multiple identical shots from a tripod, but at different exposure levels. Typically, you’ll take three or five photos: one “correct” exposure as the camera sees it, one or two underexposed shots to capture all the detail in the bright sky, and one or two overexposed shots to capture the hidden details in the darkest shadows of the valley.
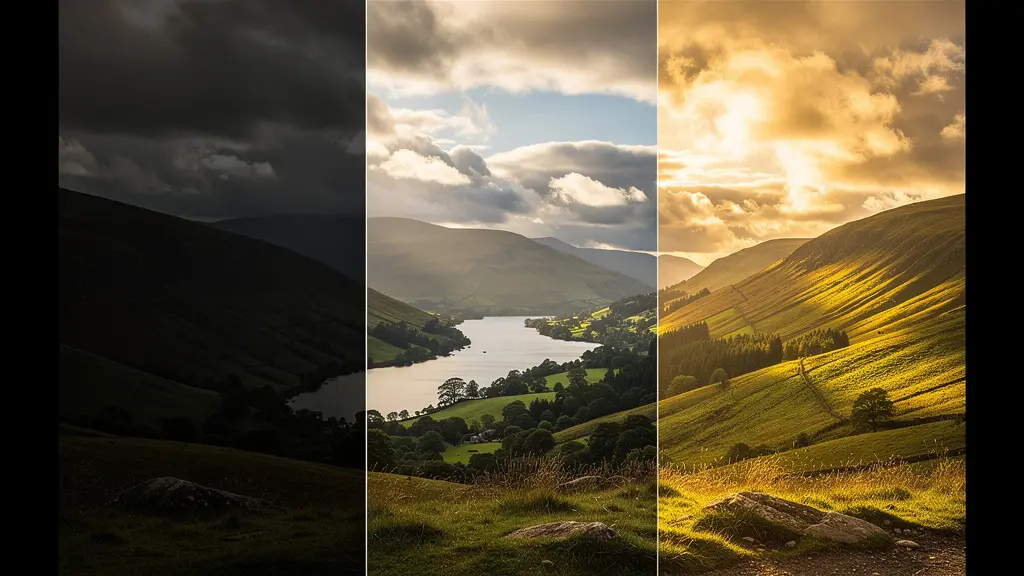
In post-processing software, these separate exposures are then blended together. You can do this manually using layers and masks or with automated HDR (High Dynamic Range) functions. The goal is to create a single, final image that has the best of all worlds: a dramatic sky full of texture and colour, and a valley floor rich with detail, shadow, and form. It’s a technical process, but it’s the only way to faithfully reproduce the scene as your eyes perceived it.
Mastering this technique is a significant step up. It moves you from being a passive recipient of the available light to an active manager of it, allowing you to build the final image with intention and control.
The Fitness Reality: Carrying a Tripod Up Scafell Pike?
The most dramatic viewpoints in the Lake District are rarely by the side of the road. While recent data shows over 17.7 million tourists visited the Lake District in a year, the vast majority will experience the fells from the valleys and accessible shores. The serious photographer must go higher. This is where the “mountaineer” part of the job description becomes a physical reality. Capturing an “earned shot” means having the fitness to carry the necessary gear to an elevated position, often in the dark, to be ready for sunrise or sunset.
This gear inevitably includes a tripod. It is not optional. It is essential for the bracketing techniques we’ve discussed, for the long exposures needed in low light, and for the pin-sharp focus required for professional-quality prints. Carrying a tripod, a camera, and multiple lenses up a peak like Scafell Pike is a significant physical undertaking. Your choice of gear becomes a delicate balance of capability versus weight. A heavy, sturdy tripod is best for stability, but a lightweight carbon-fibre model is what you’ll actually be willing to carry to the summit.
This matrix helps in planning your shoots, weighing the physical commitment against the potential photographic reward. It underlines the core truth: the best shots require the most effort.
| Location | Difficulty Level | Equipment Recommendation | Best Photographic Reward |
|---|---|---|---|
| Scafell Pike Summit | Very Challenging | Lightweight tripod essential | 360° panoramic views |
| Wastwater Shore | Easy Access | Full kit possible | Dramatic reflections with screes |
| Great Langdale Valley | Moderate | Standard kit manageable | Upward views emphasizing scale |
| Buttermere | Easy to Moderate | Full equipment viable | Classic lone pine compositions |
As this comparative analysis of locations shows, effort is directly correlated with reward. Therefore, a smart gear strategy is paramount.
Your Action Plan: Smart Gear Selection for Fell Photography
- For mountain photography: Prioritize a 70-200mm telephoto lens to isolate compositions from a distance.
- For woodland scenes: Pack a 28-50mm range for a natural perspective without distortion.
- For seascapes: Bring an ultra-wide 14-18mm for dramatic foreground inclusion.
- For valleys: Consider both a wide angle for scale and a telephoto for compression effects.
- Universal tip: If choosing just one lens for the mountains, select the 70-200mm for maximum compositional flexibility.
Ultimately, the weight on your back is the price of admission for images that rise above the millions of casual snapshots taken from the valley floor.
Wastwater vs Windermere: Which Lake Offers the Most Dramatic Reflections?
Not all lakes are created equal, especially for the photographer seeking drama and scale. While Windermere is the most famous and accessible, its gentle, rolling shores and bustling activity often lead to pastoral, picturesque scenes. It is beautiful, but rarely ‘epic’. For raw, untamed drama and the most powerful reflections, you must travel west to Wastwater. It offers a completely different character: austere, brooding, and profoundly cinematic.
The key difference lies in the topography. Windermere’s fells rise gently from its shores. At Wastwater, the infamous screes plunge almost 600 meters directly into England’s deepest lake. This sheer, vertical rise creates an unparalleled sense of scale and power. When the water is still, typically at dawn before the wind picks up, the reflections of Great Gable, Lingmell, and Scafell Pike are near-perfect and utterly imposing. The lack of shoreline clutter and development keeps the compositions clean and minimalist.
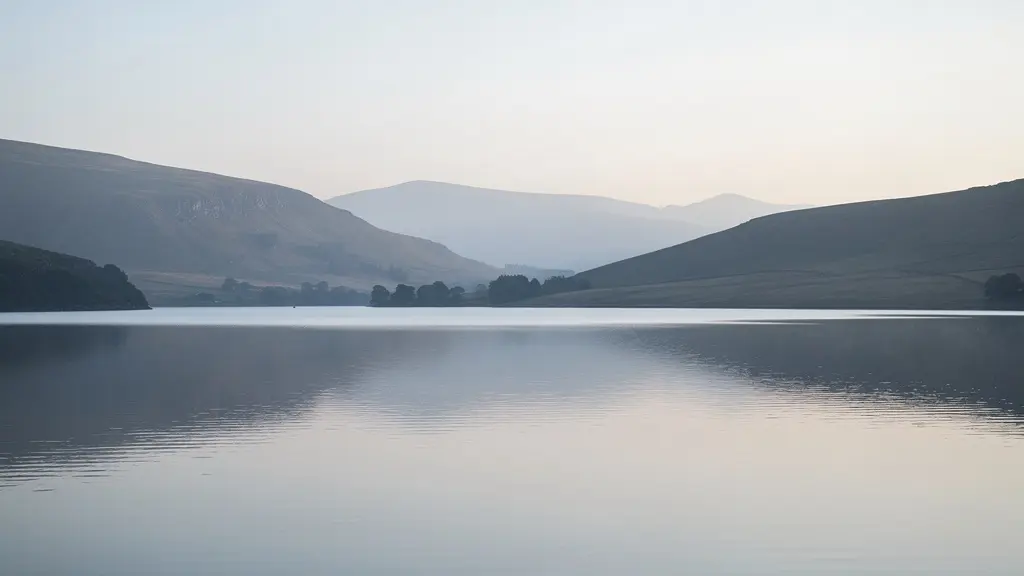
Choosing Wastwater over Windermere is a conscious decision to trade convenience for atmosphere. It requires more effort to get there, but the reward is images with a primal, geological force that Windermere simply cannot offer. It’s about seeking out locations that do some of the compositional work for you. The challenge, of course, is to find a unique perspective in these well-photographed locations.
As Vallerret Photography Gloves Ambassador Lee Gale notes, the sheer volume of photographers presents a challenge to originality:
With over 15 million visitors going to the Lake District every year, a lot of them being photographers of some level, you may find it hard to find a unique shot of any location within the Lake District…but I implore you to try!
– Lee Gale, Vallerret Photography Gloves Ambassador Interview
This pursuit of a unique vision, even in an iconic spot, is what defines the dedicated photographer from the casual tourist.
Mountain Weather Hazards: When to Abandon a Shoot for Safety?
The ‘best’ weather for dramatic landscape photography is often the ‘worst’ weather for a pleasant walk. Brooding clouds, shafts of light breaking through a storm, morning mist rising from a valley—this is the currency of atmospheric fell photography. While April and May are statistically the driest months, some of the most compelling images are made when the weather is at its most volatile. You should not be deterred by a forecast of cloud and rain; you should see it as an opportunity for mood and drama.
However, there is a critical line between seeking atmosphere and ignoring genuine danger. The mountain always has the final say. Rapidly changing conditions, especially at high altitudes, can turn a photoshoot into a survival situation. Low cloud or fog can descend in minutes, causing complete disorientation. Wind speeds can make simply standing upright a challenge, let alone operating a camera on a tripod. The cold can numb fingers and drain battery life with astonishing speed.
Knowing when to abandon the shot is a more important skill than any camera setting. No photograph is worth your life. Your primary responsibility is to the mountain and to your own safety. This means meticulous planning, checking multiple, reliable weather sources (like the Mountain Weather Information Service), and having the humility to turn back. As a mountaineer-photographer, your safety is paramount. Here are the non-negotiable rules:
- Always check the latest, most detailed mountain weather forecast before you even pack your bag.
- Share your intended route and estimated return time with someone reliable.
- Carry a full, waterproof rain cover for both your backpack and your camera.
- Pack warm layers, a hat, and gloves, even on a summer’s day. Mountain temperatures can plummet unexpectedly.
- In low cloud or fog, stick to known paths and avoid exposed ridges to prevent disorientation.
- Wear proper, well-fitted walking boots with ankle support; wet rock and boggy ground are treacherous.
- Save the most challenging routes, like the high ridges of Scafell Pike or Helvellyn, for days with clear visibility. This advice from a guide on Lake District safety is critical.
The ‘earned shot’ is one you come home from. The best photographers are the ones who live to shoot another day.
Why British Cities Look Better in High Contrast Black and White?
There is a long-held belief in photography that high-contrast monochrome is the perfect medium for capturing the grit, geometry, and layered history of British cities. It strips away distracting colours and reveals the raw structure beneath. While this is true, this principle of revealing form finds its most sublime and powerful expression not on city streets, but on the ancient, weathered faces of the Lake District fells.
When you convert a typical Lakeland scene to black and white, something magical happens. The pretty, pastoral greens and blues, which can often look flat and uninspiring, are transformed into a complex tapestry of tones. This is called tonal separation. The autumnal colours of bracken and the layers of morning mist, when rendered in monochrome, create distinct, repeating bands of grey, from near-black in the foreground to pale white in the far distance. This technique powerfully emphasizes the very depth and layering that is so often lost in colour.
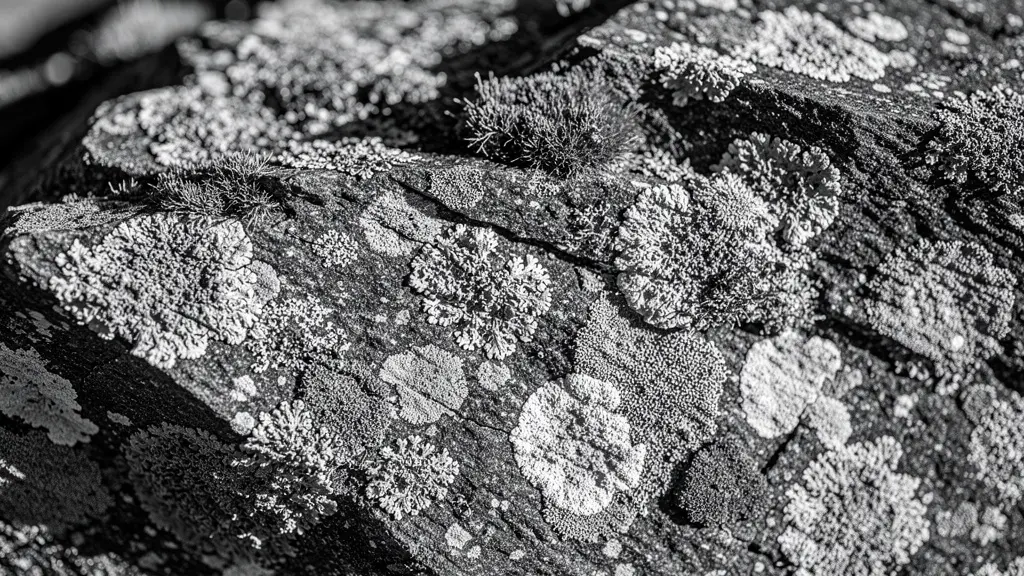
Monochrome forces the viewer to see the landscape differently. It is no longer a picture of a place, but a study in form, texture, and light. The geological structure of the fells, the rough texture of the volcanic rock, the delicate patterns of lichen—all are brought to the forefront. By stripping away colour, you are not removing information; you are revealing a deeper truth about the landscape’s fundamental shapes and ancient character. It transforms the picturesque into the sublime.
Shooting with black and white in mind from the start, focusing on shape and contrast, will fundamentally change how you see and capture the fells.
How to Use Negative Space to Emphasize Scale in Glencoe Valley?
The principles of creating scale are universal in mountain photography. A classic technique, powerfully demonstrated in the dramatic landscapes of Scotland’s Glencoe Valley, is the masterful use of negative space. This is the art of using large areas of ’emptiness’ in your composition to give your main subject immense visual weight and prominence. We can—and should—apply this exact same principle to the lakes and skies of the Lake District to combat the problem of flat, cluttered images.
The most effective use of this in the Lakes is to let the surface of a lake dominate your frame. Wastwater, again, is the supreme example. Its dark, still surface, when used as the entire foreground and mid-ground of your image, creates a vast, clean void. This emptiness acts as a powerful compositional tool. It pushes the eye upward, forcing it to confront the scale of the screes and fells that rise directly from the water’s edge. The emptiness of the water gives ‘weight’ to the mass of the mountains.
You can achieve a similar effect with the sky. On a misty day, a huge, blank, white sky above a single, dark ridgeline can make that ridge feel isolated, immense, and dramatic. The key is to be bold. Don’t be afraid to dedicate two-thirds or more of your photograph to ‘nothing’. This ‘nothing’—the calm water or the empty sky—is what gives the ‘something’—the mountain—its power and context. It provides breathing room in the composition and tells the viewer exactly what is important.
By embracing emptiness, you are not wasting space; you are actively sculpting the viewer’s perception of scale and making your subject feel truly monumental.
Key Takeaways
- True scale in landscape photos comes from telephoto compression, not wide-angle distortion.
- Mastering exposure bracketing is essential for controlling the high-contrast light of the fells.
- The best photographs are earned; physical fitness and a willingness to carry gear are part of the craft.
How to Sequence a British Landscape Portfolio to Impress Editors?
A collection of your best shots is not a portfolio. A portfolio is a narrative. It’s a curated, sequenced story that demonstrates not only your technical skill but also your unique vision and your ability to think like an editor. When presenting your work, especially on a subject as well-documented as the British landscape, the flow of the images is just as important as their individual quality. A strong sequence guides the viewer’s eye and builds an emotional arc.
You must think in terms of pacing and variety. A relentless series of epic, wide-angle sunsets becomes monotonous. A powerful portfolio balances the grand with the intimate, the epic with the detail. It shows that you can see the big picture and also the subtle stories within it. The sequence should feel like a journey, showcasing your versatility and deep connection to the landscape.
A proven strategy for sequencing a landscape portfolio involves a clear narrative structure:
- Start with a powerful, wide establishing shot from an elevated viewpoint to set the scene and grab attention.
- Follow this with more intimate, telephoto details that were extracted from that wider vista, showing you can see stories within the grand view.
- Include an image with a human element—a lone hiker, a distant tent—to provide a clear sense of scale and journey.
- Introduce a dramatic weather shot to demonstrate your ability to work in challenging conditions and capture the fells’ changing moods.
- Incorporate at least one minimalist composition that skillfully uses negative space, proving your compositional maturity.
- Close with a contemplative, quieter dawn or dusk scene that suggests continuation and leaves the editor wanting to see more.
Case Study: The 5-Day Portfolio Narrative
Photographer Gary Gough’s project documenting the Lake District over 5 days exemplifies this narrative approach. His final selection of 36 images was sequenced to tell a complete story, blending classic viewpoints with newly discovered locations. The series masterfully balances technically demanding sunrise and sunset shots with raw, dramatic weather captures, showing the full arc of a photographic journey from arrival to departure and highlighting both the immense challenge of the terrain and the rewarding results of persistence and a clear vision.
Your portfolio is your single best argument for why your vision matters. Treat its construction with the same care and intention as you would your most important photograph.