The secret to natural HDR isn’t about toning down effects in post-processing; it’s a disciplined workflow that prioritizes capturing pristine data in-camera.
- Success starts before you press the shutter, with intentional bracketing and a deep understanding of your histogram to secure the full dynamic range.
- Superior results often come from manual blending techniques that give you full control over the image’s tonal architecture, avoiding the artificial look of automated software.
Recommendation: Shift your focus from “fixing” HDR images to building them from a foundation of high-quality, motion-free, and perfectly exposed source files.
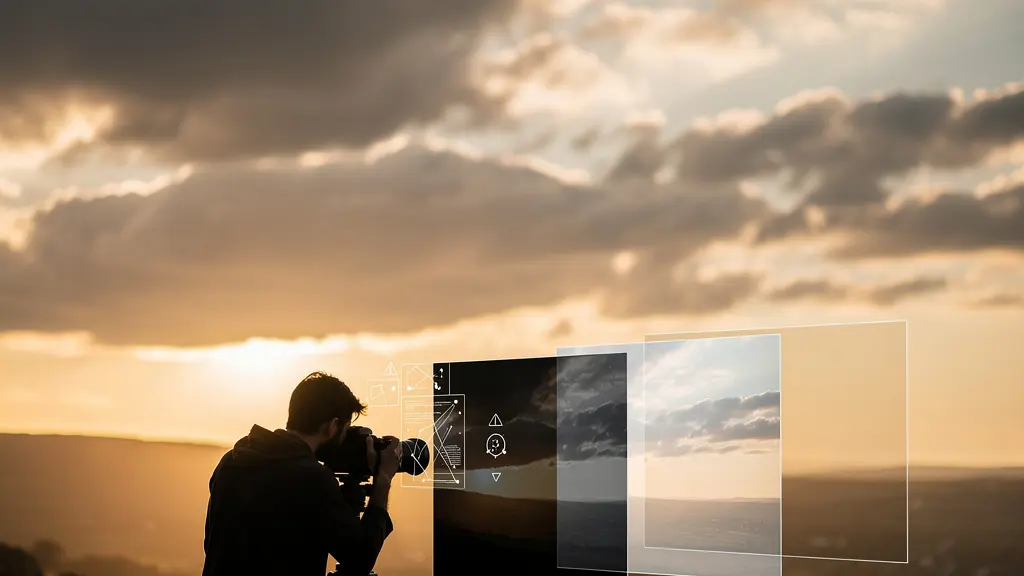
For many landscape photographers, the term “HDR” conjures images of oversaturated skies, glowing edges, and an artificial, hyper-real look that feels more like a video game than a photograph. The internet is littered with examples of High Dynamic Range photography gone wrong, leading many purists to dismiss the technique entirely. They rely on the usual advice: use a tripod, don’t push the sliders too far, and hope for the best. But what if this approach is fundamentally backward?
The path to a truly natural HDR image—one that captures a scene as the eye perceived it, full of rich shadow detail and nuanced highlights—doesn’t begin with damage control in software. It begins in the field. It’s a philosophy rooted in the meticulous protection of data integrity from the moment of capture. This means moving beyond default bracketing and generic processing to a more intentional and technical methodology. It involves treating your source files not as rough drafts, but as the foundational components of a final, realistic image.
This guide abandons the simplistic “be subtle” mantra. Instead, we will deconstruct the professional workflow for creating HDRs that are powerful yet believable. We’ll explore how to handle movement, why manual control often triumphs over automation, and how to read your camera’s data to guarantee a perfect capture. We will show you how to build a photograph with an extended dynamic range, not just apply an effect, transforming your understanding of what HDR can truly be.
To navigate this deep dive into realistic HDR, we’ve structured this guide to address the most critical challenges and decisions you’ll face. From mastering the capture to making intelligent choices in post-processing, each section builds on the last to form a complete, professional workflow.
Summary: A Workflow for Natural High Dynamic Range Photography
- Why Leaves and Waves Ruin Your Brackets and How to Fix It?
- Manual Blending or Software Automations: Which Preserves Detail Better?
- How to Read the Histogram to Ensure You Captured the Full Dynamic Range?
- The Micro-Movement Mistake That Destroys Sharpness in HDR Brackets
- Lightroom vs Photomatix: Which Engine Handles Highlight Rolloff Best?
- Bracketing Exposures: How to Balance Bright Skies and Dark Valleys?
- Why British Cities Look Better in High Contrast Black and White?
- Why Use a Monochrome-Only Sensor Instead of Converting Color Files?
Why Leaves and Waves Ruin Your Brackets and How to Fix It?
One of the first and most obvious signs of a poorly executed HDR is “ghosting”—the blurry, transparent, or duplicated appearance of objects that moved between exposures. Flowing water, wind-blown leaves, or passing clouds are common culprits that can ruin an otherwise perfect set of brackets. Automated HDR software attempts to fix this with “de-ghosting” algorithms, but these are often a blunt instrument, leading to unnatural artifacts or a loss of texture in the very areas you want to showcase.
The professional approach prioritizes control and treats motion not as a problem for software to guess at, but as a specific element to be managed manually. The goal is to combine the best of both worlds: the rich, static detail from your HDR-merged background and the crisp, motion-frozen detail from a single, sharp exposure. This technique, often called base exposure masking, is a cornerstone of creating believable landscape HDRs.
A refined workflow for this process starts long before merging. According to a professional workflow for handling movement, it is crucial to set a consistent white balance and apply only minimal sharpening and noise reduction across all brackets before you even begin. This ensures the frames blend seamlessly. Here’s a breakdown of the manual fix:
- Identify Your “Hero” Frame: In your bracketed sequence, find the single exposure that has the sharpest rendering of the moving elements. This is typically the one with the fastest shutter speed.
- Process the Static Elements: Merge your other brackets (the ones without significant motion or where motion doesn’t matter) using your preferred HDR software. This creates your base HDR layer with optimal dynamic range for all non-moving parts of the scene.
- Layer in Photoshop: Place your processed HDR image as the bottom layer and the sharp “hero” frame on a layer above it.
- Mask with Precision: Create a layer mask on the top layer. By painting on this mask, you can precisely reveal the sharp moving water or leaves from the hero frame while keeping the perfectly exposed static elements from the HDR layer underneath.
- Feather and Blend: Use a soft-edged brush to blend the transition between the two layers, making the composite completely invisible to the viewer. This gives you absolute control over the final look, preserving the beautiful motion blur of water or the crispness of leaves without any digital ghosting.
This manual intervention is the difference between an image that feels digitally manipulated and one that feels authentic. It respects the integrity of the scene’s different components, a recurring theme in high-end HDR processing.
Manual Blending or Software Automations: Which Preserves Detail Better?
The choice between automated HDR software and manual blending with luminosity masks is at the heart of the natural HDR debate. Automated tools offer speed and convenience, merging multiple exposures into a 32-bit file and providing sliders for “tone mapping”—the process of compressing the vast dynamic range into a viewable image. However, this convenience often comes at the cost of control, leading to the very artifacts photographers try to avoid: halos, excessive local contrast, and unnatural textures.
Manual blending, on the other hand, is a more deliberate and artistic process. It involves loading your bracketed exposures as layers in a program like Photoshop and using hyper-targeted selections, called luminosity masks, to blend the best-exposed parts of each frame. You might paint in the perfectly exposed sky from your darkest frame, the rich midtones from your middle frame, and the detailed shadows from your brightest frame. This method is fundamentally about building the tonal architecture of your image by hand.
This approach gives you ultimate control over every pixel, allowing for far more nuanced and realistic transitions between light and shadow. It is the key to preventing the tell-tale “HDR glow” around high-contrast edges. The difference in philosophy is significant, as a direct comparison shows.
| Aspect | Manual Blending | Software Automation |
|---|---|---|
| Control Level | Complete artistic mastery | Limited to presets and sliders |
| Processing Time | 30-60 minutes per image | 2-5 minutes per image |
| Detail Preservation | Superior, especially at complex edges | Good for general scenes |
| Learning Curve | Steep – requires Photoshop expertise | Gentle – intuitive interfaces |
| Best For | Fine art, commercial work | High-volume processing, beginners |
Ultimately, the goal of HDR is not just to capture data, but to present it in a way that connects with the viewer’s experience of being there. As pioneering HDR photographer Trey Ratcliff notes, it’s about bridging the gap between what a camera sees and what the mind perceives. He states in his renowned guide:
The HDR process helps the photos look more evocative and alive… cameras are very good at capturing ‘images’, lines, shadows, shapes — but they are not good at capturing a scene the way the mind remembers and maps it.
– Trey Ratcliff, Stuck in Customs HDR Photography Guide
While software provides a starting point, achieving that evocative quality Ratcliff describes often requires the delicate, hands-on approach of manual blending to truly craft the light and shadow in your final image.
How to Read the Histogram to Ensure You Captured the Full Dynamic Range?
The histogram is the single most important tool for successful HDR capture. It is an objective, data-driven representation of your image’s tonal range, and learning to read it correctly is non-negotiable for anyone serious about natural HDR. Many photographers make the mistake of only checking for “clipping”—where the graph touches the absolute black on the left or absolute white on the right. While avoiding clipping is essential, a truly professional reading goes much deeper.
For an HDR sequence, you aren’t looking at one histogram; you are evaluating a *series* of them. Your goal is to ensure that your bracketed exposures, when combined, contain detailed information for every single part of the scene, from the deepest shadow to the brightest highlight. This means there should be no “clipped” data in the final combined file. The brightest parts of the scene should be fully detailed in your darkest exposure, and the darkest parts should be noise-free and detailed in your brightest exposure.
A perfect set of brackets will show a sequence of graphs marching across the display, with each exposure capturing a different slice of the scene’s light. Visualizing this is key to understanding the concept of data integrity.
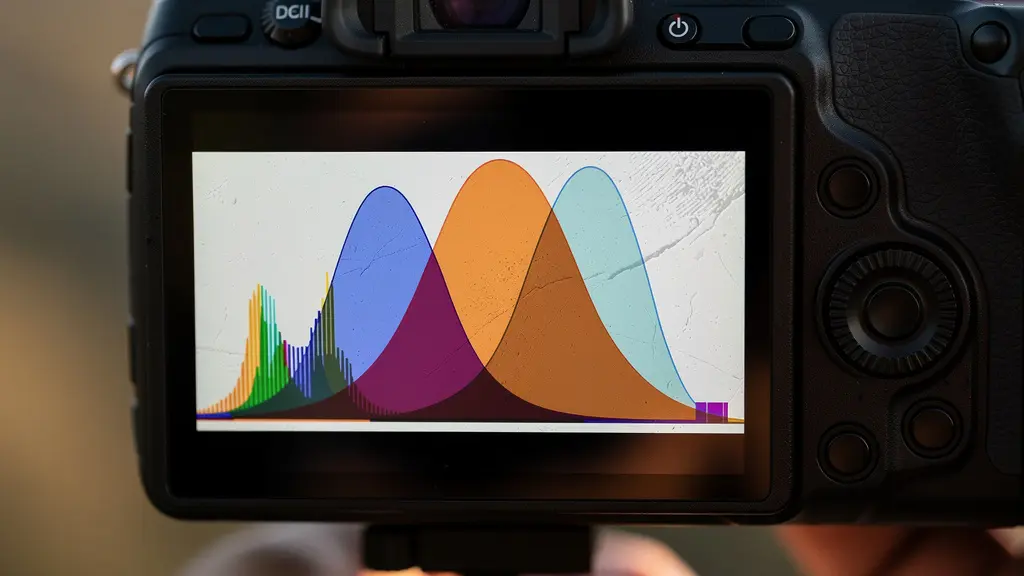
As the image above illustrates, you should see distinct “humps” of data for each bracket. Your darkest bracket’s histogram should be pushed to the left but well away from the right edge (no blown highlights). Your brightest bracket’s histogram should be pushed to the right but clear of the left edge (no crushed blacks). The middle exposure bridges the gap. The crucial part is ensuring there is an overlap between the graphs, guaranteeing a smooth blend in post-production.
Here are the key checks to perform in the field:
- Check the Darkest Frame: Look at the histogram for your underexposed shot. The data should be bunched up on the left and middle. The most important thing is that there is a definitive gap between the rightmost edge of the data and the white point. This confirms you have captured all highlight detail.
- Check the Brightest Frame: Now, review your overexposed shot. The data should be pushed to the right. Here, the critical check is for a gap between the leftmost edge of the data and the black point. This confirms you have captured all shadow detail.
- Use the “Blinkies”: Your camera’s highlight alert (often called “blinkies” or “zebras”) is your best friend. In your darkest exposure, there should be absolutely no blinking areas in the sky or other bright sources.
- Review the Sequence: Don’t just trust your camera’s Auto Exposure Bracketing (AEB). As advised by photography experts, you should always review your images and their corresponding histograms on your camera’s LCD to ensure proper coverage of the entire dynamic range.
This in-field discipline is what separates amateurs from professionals. It ensures that post-processing is a creative act of blending, not a desperate attempt to recover missing information.
The Micro-Movement Mistake That Destroys Sharpness in HDR Brackets
While photographers are often vigilant about obvious movement like swaying trees, they frequently overlook a far more insidious threat to HDR quality: micro-movement. These are the tiny, almost imperceptible vibrations caused by touching the camera, the shutter mechanism, or even a light breeze acting on the tripod. In a single exposure, they might result in a slight softness. In an HDR stack, they are catastrophic.
When each frame in your bracketed sequence is misaligned by even a fraction of a pixel, the merging software struggles to align them perfectly. This results in a global loss of sharpness and can introduce subtle but pervasive artifacts that give the image a soft, low-fidelity feel. Natural-looking HDR is built on a foundation of tack-sharp source files. Any compromise at this stage will cascade through the entire workflow, and no amount of sharpening in post-production can truly fix it.
The solution is an almost obsessive approach to camera stability. This goes far beyond simply using a tripod. It requires a systematic workflow to eliminate every possible source of vibration. According to stabilization research, any movement at shutter speeds below 1/60th of a second is enough to degrade HDR quality, making a remote or timer release an absolute necessity. The goal is a completely hands-off capture process.
Your Action Plan for Ultimate HDR Stability
- Use a Sturdy Tripod and Remote Release: This is the non-negotiable foundation. For any shutter speed below 1/60s, you must use your camera’s 2-second timer or a remote/app to trigger the shutter without touching the camera.
- Engage Mirror Lock-Up or Electronic Shutter: On a DSLR, the movement of the mirror (“mirror slap”) is a significant source of vibration. Use mirror lock-up mode. On mirrorless cameras, switch to the fully electronic shutter to eliminate all mechanical movement.
- Activate Electronic Front-Curtain Shutter (EFCS): If a full electronic shutter isn’t an option, EFCS is the next best thing. It eliminates the vibration from the first of the two shutter curtain movements, which is the most critical.
- Weigh Down Your Tripod: In windy conditions, even a sturdy tripod can vibrate. Hang your camera bag from the tripod’s center hook to add mass and dramatically increase its stability against gusts.
- Watch Your Step: Be mindful of where you stand, especially on wooden boardwalks, bridges, or soft ground. Your own movements can transfer vibrations up through the tripod legs.
By treating camera stability as a critical part of the image-making process, you ensure that your bracketed files are perfectly aligned. This is the bedrock upon which all subsequent processing for a sharp, clean, and natural HDR is built.
Lightroom vs Photomatix: Which Engine Handles Highlight Rolloff Best?
Once you have a perfect set of sharp, well-exposed brackets, the next decision is which software engine to use for the initial merge. The two most prominent players in this space have long been Adobe Lightroom (and its Photoshop counterpart, Merge to HDR Pro) and Photomatix Pro. While they both achieve the same basic goal, their underlying philosophies are quite different, and this difference is most apparent in how they handle one of the key elements of a natural-looking image: highlight rolloff.
Highlight rolloff refers to the smoothness of the transition from the brightest detailed areas of your image to pure, clipped white. In nature, this transition is gradual and soft. Film was known for its beautiful, gentle rolloff. Digital sensors, by contrast, can be harsh, and aggressive tone mapping can make this transition feel abrupt and artificial. A key part of a natural HDR look is recreating a smooth, pleasing rolloff.
The choice of software has a direct impact on this. A photography expert analysis succinctly describes the fundamental difference between the two main platforms:
Lightroom’s Photo Merge aims for a photorealistic, de-ghosted baseline rooted in the RAW data. Photomatix is a ‘Tone Mapping’ engine at heart, offering more aggressive and stylized algorithms.
– Digital Photography Expert, HDR Software Comparison Analysis
Lightroom’s approach is generally considered more conservative and “photorealistic.” It prioritizes creating a 32-bit DNG file that looks like a single, perfectly exposed RAW file with an enormous amount of latitude. Its highlight rendering is typically more subtle and controlled out of the box. Photomatix, as a dedicated tone mapping engine, offers a wider array of creative options and powerful sliders that can pull more apparent detail from the extremes, but this power can easily lead to the compressed, “crunchy” highlights that are characteristic of the unnatural HDR look. Many professionals now adopt a hybrid workflow, using Lightroom for its superior RAW processing and initial merge, then potentially using other tools for more targeted adjustments.
For photographers prioritizing realism, starting with Lightroom’s more neutral rendering often provides a better foundation. It allows you to build contrast and detail deliberately, rather than having to dial back an overly aggressive automated interpretation.
Bracketing Exposures: How to Balance Bright Skies and Dark Valleys?
The core mechanic of HDR is exposure bracketing, yet most photographers rely on their camera’s default Auto Exposure Bracketing (AEB) setting, typically three shots at -2, 0, and +2 EV (Exposure Value). While this works for many situations, it’s a one-size-fits-all approach to a problem that is unique to every scene. For true precision and data integrity, you must move to intentional bracketing, where your choices are dictated by the scene’s specific dynamic range, not a camera preset.
The professional method involves using your camera’s spot meter to measure the brightest and darkest parts of the scene where you need to retain detail. This tells you the exact number of “stops” of light between the shadows and highlights. For example, if you spot meter a bright cloud (but not the sun itself) and then spot meter a deep, dark rock in the foreground, your camera will tell you the exposure difference between them. This data is what should inform your bracketing strategy.
Here’s a simple framework for deciding how to bracket based on your spot meter readings:
- Less than 5 stops: The scene’s dynamic range is likely within what your camera’s sensor can capture in a single RAW file. HDR is probably not necessary; a single well-exposed shot will suffice.
- 5 to 7 stops: This is the sweet spot for a standard 3-shot bracket. Using a +/- 2EV spacing will comfortably cover the entire tonal range of the scene.
- More than 8 stops: For extreme scenes like shooting directly into a sunrise or a dark interior with bright windows, you will need more frames. A 5 or 7-shot bracket at +/- 1EV or +/- 2EV spacing is required to ensure you capture every bit of information without gaps.
Most modern cameras have robust AEB systems that allow this customization. While a 3-shot sequence at +/- 2 stops is often sufficient, many landscape photographers will capture five, seven, or even nine frames for complex scenes to ensure maximum quality and blending flexibility in post. The key is that the decision is informed by the scene itself.
By moving beyond the default AEB and tailoring your bracketing strategy to the specific light you’re facing, you guarantee that you arrive at your computer with all the necessary data to build a seamless and realistic final image.
Key Takeaways
- Natural HDR is a result of a meticulous workflow, not just software settings. It starts with capturing pristine, motion-free source files.
- Mastering the histogram to ensure you’ve captured the full dynamic range without clipping highlights or shadows is the most critical in-field skill.
- Manual blending techniques, while more time-consuming, offer superior control and realism over automated software, especially at complex edges.
Why British Cities Look Better in High Contrast Black and White?
At first glance, a discussion of black and white photography might seem out of place in an HDR guide. However, converting an image to monochrome is the ultimate test of its tonal architecture. An image with poor dynamic range will look flat and muddy in black and white. Conversely, a well-executed color HDR file, packed with nuanced information from the deepest shadows to the brightest highlights, provides the perfect raw material for a dramatic and powerful monochrome conversion.
This is particularly true for urban environments, and British cities serve as a prime example. The unique combination of architectural textures and often challenging lighting conditions makes them ideal subjects. As one urban photography specialist explains, the environment itself is primed for this treatment:
British urban environments (a mix of Victorian brick, Portland stone, modern glass, and often-overcast skies) are rich in texture and form. A high-contrast B&W conversion, fed by the deep shadow and highlight detail from an HDR, emphasizes this architectural drama.
– Urban Photography Specialist, Architectural HDR Photography Guide
The overcast, diffused light common in the UK acts as a giant softbox, reducing harsh shadows but also lowering overall contrast. An HDR-to-B&W workflow restores and enhances this drama. By first creating a natural color HDR, you capture the maximum amount of tonal information. Then, during the black and white conversion process (often using dedicated plugins like Silver Efex Pro), you can use the color channel sliders with surgical precision. For example, you can darken the blue channel to make the sky almost black, while simultaneously brightening the red and yellow channels to make brick buildings pop with texture and luminosity.
This method allows you to sculpt the light in a way that simply isn’t possible from a single exposure. The deep data from the HDR file prevents noise from appearing in the shadows when you push them, and it preserves delicate texture in the highlights when you brighten them. It’s not just a filter; it’s a way of revealing the underlying form and texture that a color image can sometimes obscure.
Ultimately, a successful high-contrast black and white image is definitive proof that you mastered the HDR capture process. If the monochrome version is rich, detailed, and free of noise, you know the underlying tonal structure of your file is rock solid.
Why Use a Monochrome-Only Sensor Instead of Converting Color Files?
For the ultimate purist in black and white photography, there is a final, decisive step beyond software conversion: using a camera with a monochrome-only sensor. This might seem like an extreme and limiting choice, but for those dedicated to the craft, it represents the pinnacle of luminance data integrity. Cameras like the Leica M Monochrom or Q2 Monochrom are built on a philosophy that directly aligns with the core principles of high-quality HDR: maximizing the quality of the raw data at the point of capture.
A standard color sensor uses a Color Filter Array (CFA), or Bayer filter, where each pixel is dedicated to capturing only red, green, or blue light. The camera’s processor then has to interpolate the other two colors for that pixel in a process called demosaicing. This inherently involves a degree of estimation and can lead to a slight loss of per-pixel sharpness and the introduction of color noise artifacts.
A monochrome sensor has no Bayer filter. Every single pixel is dedicated to capturing one thing: luminance (brightness). This has two profound benefits. First, it results in a dramatic increase in per-pixel sharpness and detail rendition, as no interpolation is needed. Second, without the filter blocking some of the light, the sensor is inherently more sensitive. In fact, specialized monochrome sensors without Bayer filters achieve up to a full stop (a 100%) increase in light sensitivity, leading to significantly cleaner images at high ISOs.
The tradeoff, of course, is a complete lack of flexibility. You cannot go back to a color version, and all color-based tonal adjustments must be done in the “real world” using physical colored filters on the lens (e.g., a red filter to darken skies), just as photographers did in the film era. The cost is also a major factor, as these are niche, high-end cameras. For most photographers, converting a high-quality color HDR file remains the most practical path to a stunning black and white image. However, understanding why monochrome sensors exist reinforces the central theme: the closer you get to perfect, unadulterated data at the source, the higher the quality of the final output.
Whether through a meticulous HDR-to-B&W workflow or a dedicated monochrome camera, the goal is the same: to craft an image built on the richest, cleanest tonal information possible. Begin applying these principles today, and you will move beyond creating “HDRs” to crafting photographs with unparalleled depth and realism.