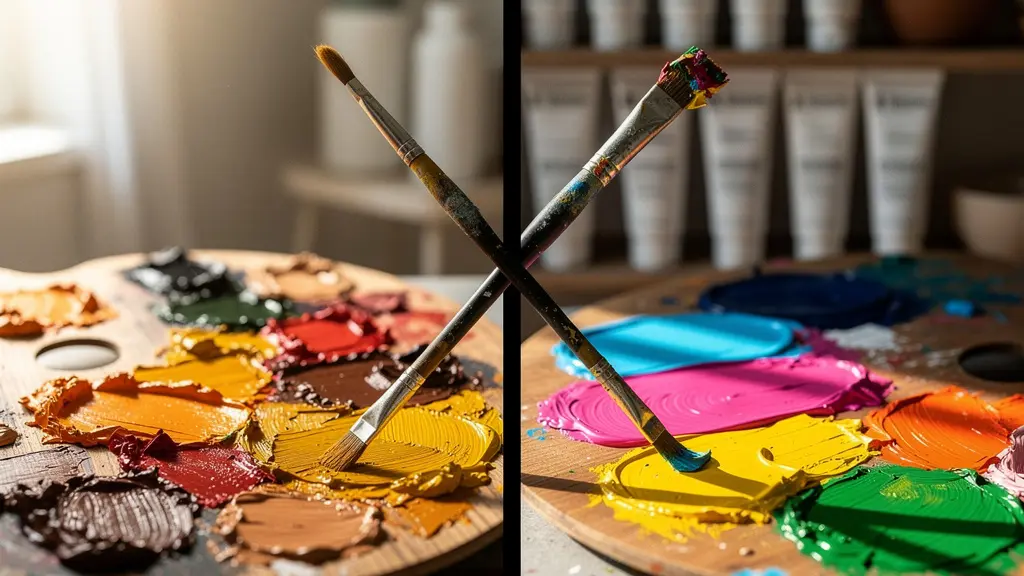
Choosing between oil and acrylic for layering isn’t about “fast vs. slow drying”—it’s about understanding two fundamentally different chemical processes: oxidation and coalescence.
- Oil paint cures by oxidation, a slow chemical reaction with oxygen that requires a ‘fat over lean’ sequence to prevent the film from cracking.
- Acrylic paint dries by coalescence, a physical process where water evaporates and polymer particles fuse, demanding careful attention to curing time before sealing.
Recommendation: Master the chemistry of your chosen medium to control its behavior, ensuring your layers adhere properly and the final work remains stable for decades.
As a painter, you face a critical choice every time you begin a new layer: oil or acrylic? The common advice is simple: oils are slow-drying and blendable, while acrylics are fast and forgiving. But this surface-level knowledge often leads to technical failures—cracking, peeling, and dull, lifeless passages. The frustration you feel when a painting fails months or years later isn’t a lack of talent; it’s a lack of understanding of the materials themselves.
The internet is filled with dogmatic rules: always fat over lean, never acrylic over oil. While correct, these rules are often presented without context, leaving artists to follow them blindly. But what if the key to mastering layering wasn’t in memorizing rules, but in understanding the fundamental chemistry at play? What if you could think like a studio technician, diagnosing your materials’ behavior instead of just hoping for the best?
This guide moves beyond the platitudes. We will dissect the chemical DNA of both oil and acrylic paints. We will explore how they form a film, why they crack, and how they adhere to one another. By understanding the ‘why’ behind the rules—the processes of oxidation and coalescence, the nature of pigments, and the principles of conservation—you will gain true control over your layering techniques, ensuring your artistic vision is built on a foundation that will last.
This article dissects the core technical differences between oil and acrylic paints to empower your layering decisions. Below is a summary of the topics we will explore, from foundational chemical principles to long-term conservation ethics.
Summary: Oil vs. Acrylic: A Deep Dive into Layering Techniques
- Fat Over Lean: The Rule You Must Follow to Prevent Cracking Oil Paint?
- Transparent vs Opaque Pigments: Which Ones Create Glowing Shadows?
- Solvent-Free Oil Painting: Is It Really Possible to Ditch Turpentine?
- When is Safe to Varnish? The Risk of Sealing an Acrylic Painting Too Soon?
- Can You Paint Oil Over Acrylic? The Definitive Answer on Adhesion?
- Why Humidity Fluctuations Destroy Victorian Woodwork Within Months?
- Acetone to Saliva: How Do Conservators Choose the Right Cleaning Agent?
- Why Reversibility is the Golden Rule of Modern Conservation?
Fat Over Lean: The Rule You Must Follow to Prevent Cracking Oil Paint?
The “fat over lean” principle is perhaps the most cited rule in oil painting, yet it’s often misunderstood as a simple recipe. At its core, it’s a strategy for managing the chemical process of oxidation. Unlike acrylics, which dry through water evaporation, oil paint cures by reacting with oxygen in the air. This process causes the paint film to polymerize, cross-link, and expand slightly as it solidifies. The more oil a paint layer contains (making it “fat”), the more oxygen it needs and the longer and more significantly it will expand as it cures.
The rule, therefore, is a matter of structural engineering. A “lean” layer (thinned with a solvent like turpentine or with less oil content) cures faster and moves less. If you place this faster-drying, less flexible layer on top of a slow-curing, still-expanding “fat” layer, the top layer will be pulled apart from below, resulting in catastrophic cracking. As the foundational resource Wikipedia explains, the goal is to apply paint with a higher oil-to-pigment ratio (‘fat’) over paint with a lower ratio (‘lean’) to ensure a stable paint film.
Think of it like building on an unstable foundation. You must ensure the lowest, earliest layers are the most rigid and fastest-curing. Each subsequent layer must be progressively more flexible (fatter) to accommodate the movement of the layers beneath it. Ignoring this chemical imperative doesn’t just risk a crack; it guarantees the eventual self-destruction of the paint structure.
Transparent vs Opaque Pigments: Which Ones Create Glowing Shadows?
The choice between oil and acrylic is only part of the equation; the pigments you choose dictate how your layers interact with light. This isn’t about color, but about the physical structure of the pigment particles. Opaque pigments, like Titanium White or Cadmium Red, have a high refractive index and are composed of large, irregular particles that block light. When light hits them, it bounces off the surface, completely hiding the layers underneath. They are ideal for initial block-ins, covering mistakes, or creating solid, flat areas of color.
Transparent pigments, such as Phthalo Blue or Quinacridone Magenta, are made of fine, uniform particles that allow light to pass through them. When you apply a transparent glaze, light travels through that layer, hits the underlying color, and then reflects back to your eye, carrying information from both layers. This is the secret to creating “glowing” shadows and luminous depth. By glazing a transparent dark color (like a Phthalo Green) over a warm, light underpainting (like a Transparent Oxide Red), the light penetrates the dark layer, picks up the warmth from below, and returns to the eye with a complex, vibrant energy that a single mixed color could never achieve.
This technique, known as optical mixing, is where the true magic of layering happens. It creates a sense of depth and luminosity because the color is literally built in three dimensions, layer by layer, rather than just on the surface.
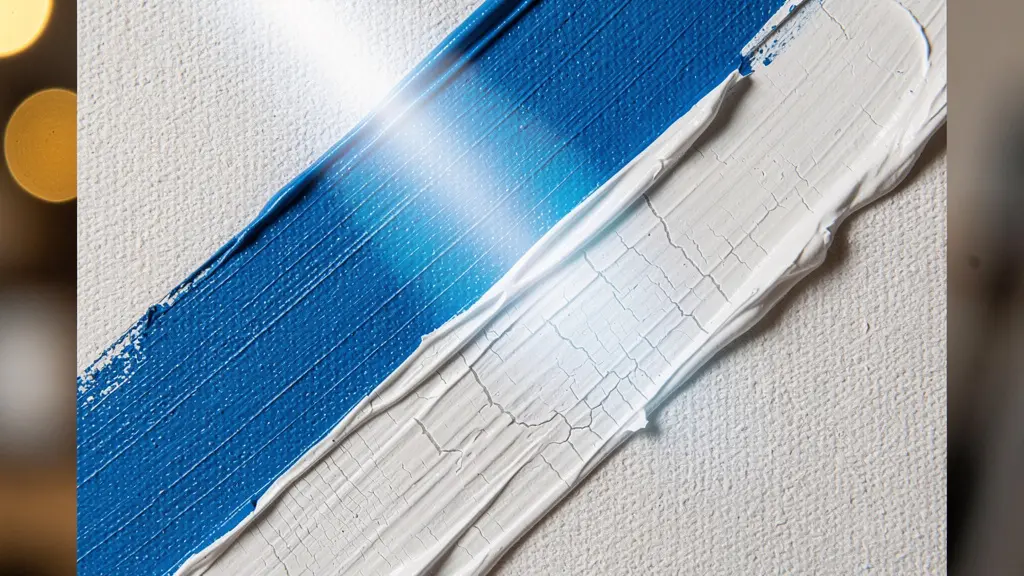
As the visual demonstration above shows, the way light interacts with your paint is a physical phenomenon you can control. Opaque pigments create a wall; transparent pigments create a window. Mastering layering is about knowing when to build walls and when to open windows to reveal the light within.
Solvent-Free Oil Painting: Is It Really Possible to Ditch Turpentine?
One of the most significant deterrents for artists considering oils is the perceived toxicity and odor of solvents like turpentine and mineral spirits. This has historically pushed many beginners towards acrylics. However, the notion that oil painting is inherently toxic is a myth rooted in tradition, not modern chemistry. In reality, the toxicity comes from the solvents, not the oil paint itself (which is simply pigment mixed with a drying oil like linseed or walnut oil). It is entirely possible to have a completely solvent-free oil painting practice.
As modern oil painting techniques demonstrate, achieving a 100% solvent-free workflow is not only possible but also offers new creative avenues. Instead of using solvents to thin paint for initial layers (the “lean” part of fat over lean), you can use the paint straight from the tube or use a tiny amount of a fast-drying medium. For cleaning brushes, a rag and a small amount of vegetable oil followed by soap and water is perfectly effective.
For artists who still want to modify their paint’s consistency, a range of solvent-free alternatives exists, each with its own properties. Understanding these options is crucial for any studio technician or serious artist.
| Alternative | Drying Speed | Yellowing Risk | Cost |
|---|---|---|---|
| Water-mixable oils | Moderate | Low | High |
| Alkyd mediums | Fast | Very Low | Medium |
| Natural oils (walnut/safflower) | Slow | Low-Medium | Medium |
The choice between these depends on your goals. Alkyd mediums are excellent for speeding up drying time and are perfect for underpaintings. Water-mixable oils offer the convenience of water cleanup, while natural oils like walnut oil can create beautiful, slow-drying glazes. By ditching the turpentine, you’re not compromising your practice; you’re making a conscious chemical choice to control your materials and your environment.
When is Safe to Varnish? The Risk of Sealing an Acrylic Painting Too Soon?
Acrylic paint’s rapid “touch-dry” time is its greatest advantage and its most deceptive trap. While an acrylic surface may feel dry to the touch in minutes or hours, it is far from chemically cured. This is because acrylics dry through a physical process called coalescence. The paint is a suspension of tiny acrylic polymer spheres in water. As water evaporates, these spheres are forced closer together until they fuse into a continuous, solid film.
The problem is that this process is not instantaneous. As the Golden Artist Colors Technical Team explains in Just Paint Magazine, the spheres “eventually compact together with enough force to squeeze out water and additives until it reaches coalescence. The cured film is now quite stable and doesn’t adversely react to moisture or subsequent paint layers.” However, this final squeezing-out of water and other volatile compounds takes time—from several days to many weeks, depending on the thickness of the paint and ambient humidity.
If you apply varnish (a non-permeable layer) too soon, you trap this residual moisture and volatiles inside the paint film. This can lead to a cloudy or hazy appearance in the varnish as the moisture tries to escape. Even more critically, it compromises the final integrity of the paint film itself. Authoritative research reveals that up to 5-20% of volatiles can remain long after the paint feels dry. Patience is not just a virtue; it’s a chemical necessity. A good rule of thumb is to wait at least one week for thin paintings and up to a month or more for thick, impasto works before applying a final varnish.
Can You Paint Oil Over Acrylic? The Definitive Answer on Adhesion?
The rule “fat over lean” governs oil-on-oil layering, but what about mixing media? The definitive answer lies in the physics of adhesion. You can safely and archivally paint oils over a layer of acrylics, but you can never paint acrylics over oils. The reason is not chemical compatibility, but mechanical adhesion.
An acrylic paint film, once cured, is a non-absorbent, slightly porous plastic. When you apply oil paint on top, the oil doesn’t form a chemical bond. Instead, it physically grips onto the microscopic texture of the acrylic surface, much like a rock climber finds handholds on a cliff face. This “mechanical tooth” is sufficient for a permanent bond, provided the acrylic surface is not too glossy. For best results, a light sanding of a glossy acrylic layer with fine-grit sandpaper can dramatically increase the surface area for the oil to grab onto.
The reverse, however, is a recipe for disaster. An oil paint film is non-absorbent and relatively slick. Furthermore, it cures by oxidation and remains flexible for a long time. If you were to apply acrylic paint (which is water-based) on top of this oily, non-absorbent surface, it would be like trying to paint on a piece of plastic wrap. There is no mechanical tooth to grab onto, and the water in the acrylic paint would be repelled by the oil. The acrylic layer would simply bead up, and even if it managed to dry, it would inevitably peel or flake off with the slightest physical stress.
Case Study: Mixed Media Adhesion Testing
The importance of this rule is not just theoretical. Professional conservators report that oil over acrylic paintings show significantly higher delamination rates after 20-30 years, particularly when the acrylic surface was glossy and unsanded, demonstrating the critical importance of proper surface preparation for mechanical adhesion.
Why Humidity Fluctuations Destroy Victorian Woodwork Within Months?
At first glance, the preservation of 19th-century architecture seems far removed from a painter’s studio. Yet, the science behind why ornate wooden panels crack and warp provides a perfect, large-scale analogy for the stresses your paint film endures. Wood is hygroscopic, meaning it absorbs and releases moisture from the air, causing it to expand in high humidity and contract in dry conditions. A painted wooden panel is, therefore, a composite structure: a flexible substrate (wood) bonded to a more rigid surface layer (paint). When the wood moves and the paint cannot stretch to accommodate it, the paint cracks and flakes.
Your painting on canvas or panel is no different. The support is constantly, if minutely, reacting to changes in temperature and humidity. The paint film must be engineered to withstand this movement. This is another reason the ‘fat over lean’ rule is so critical in oils—it creates a more flexible top layer. It’s also why acrylic film formation is temperature-dependent. As technical studies from paint manufacturers show, there is a 49°F (9°C) minimum temperature required for proper coalescence. Below this, the acrylic polymer spheres become too hard to fuse properly, creating a weak, brittle film that will surely crack under environmental stress.
Thinking like a conservator of Victorian woodwork forces you to see your painting not as a static image, but as a dynamic physical object. The layers you build must create a cohesive, flexible system capable of surviving the real-world stresses of a changing environment. As one conservation study notes, you must “imagine then if a thin, dry layer of paint sits on top of a layer that is moving and expanding – the result is cracking and lifting of the top layer.”
Acetone to Saliva: How Do Conservators Choose the Right Cleaning Agent?
The role of a studio technician or conservator extends beyond creation to preservation. Cleaning a painting is one of the most delicate and dangerous procedures, requiring a profound understanding of chemistry. The goal is to remove decades of grime, yellowed varnish, or previous restoration attempts without affecting the original paint film. The choice of cleaning agent is not guesswork; it is a precise science based on the principle of “like dissolves like.”
As conservation science research from the Museum Conservation Institute highlights, “The Teas Solubility Chart enables conservators to select precise solvent blends that target specific contaminants without affecting original paint layers.” This chart maps solvents based on their polarity and hydrogen bonding characteristics, allowing a conservator to create a custom-tailored chemical cocktail. The choice can range from the incredibly gentle to the highly aggressive, depending on the nature of the grime and the underlying paint.
This systematic approach is critical. Using a solvent that is too strong can irreversibly damage the artist’s original work, dissolving delicate glazes or altering colors. This is why a conservator’s toolkit contains such a wide array of options, each with a specific purpose and risk profile.
| Cleaning Agent | Solvent Power | Risk to Paint Film | Typical Use |
|---|---|---|---|
| Saliva (alpha-amylase) | Very Mild | Minimal | Surface grime |
| Distilled Water | Mild | Low | Water-soluble dirt |
| Mineral Spirits | Moderate | Medium | Varnish removal |
| Acetone | Strong | High | Heavy deposits |
Even human saliva is used in conservation, as the enzyme alpha-amylase is remarkably effective at breaking down surface grime with minimal risk. This illustrates the core principle: use the least aggressive method that will achieve the desired result. This same principle should guide an artist’s own studio practices, from choosing a medium to cleaning a brush.
Key Takeaways
- Oil paint cures by oxidation, a slow chemical process where flexible (“fat”) layers must be applied over rigid (“lean”) ones to prevent cracking.
- Acrylic paint dries by coalescence, a physical fusing of polymer particles that requires ample time to fully cure before a non-permeable varnish can be safely applied.
- Successful mixed-media layering relies on physics: oil’s mechanical adhesion to a porous acrylic underlayer is strong, while acrylic has no way to grip a non-absorbent oil surface.
Why Reversibility is the Golden Rule of Modern Conservation?
As artists, we focus on creation. But to create work that endures, we must adopt the primary ethic of the conservator: reversibility. This golden rule dictates that any treatment applied to an artwork—be it a varnish, an in-painting touch-up, or a structural support—should be removable in the future without damaging the original piece. Why? Because we cannot predict what future technologies will be developed or what new understanding of materials will emerge. A varnish that is considered state-of-the-art today might be found to yellow or crack in 50 years. If that varnish is reversible, a future conservator can safely remove it and replace it with a superior alternative.
This principle extends directly to the artist’s studio. When you apply a final varnish, are you using a standard, removable picture varnish, or are you sealing your painting with a permanent polyurethane from the hardware store? The latter might look good initially, but it creates a conservation nightmare, as it can never be removed without destroying the paint underneath. The same logic applies to your material choices. Are you using pigments with known lightfastness ratings, or are you using trendy, fugitive inks that will fade within a decade?
Acting with archival intent means acknowledging that you are the first custodian of your artwork. By documenting your process and materials, you are leaving a map for future conservators, enabling them to make informed decisions to preserve your work. This is not about stifling creativity; it is about wedding it to a professional responsibility for the object you are bringing into the world. As the technical team at Winsor & Newton advises, principles like “fat over lean” are not just techniques but part of a holistic approach to creating “vibrant, long-lasting oil paintings.”
Action Plan: Your Archival Documentation Protocol
- Document all paint brands and specific pigment codes (e.g., PY35 for Cadmium Yellow, PB29 for Ultramarine Blue).
- Record all mediums used, including brand and approximate mixing ratios for each layer.
- Note the ground preparation details, such as the type of gesso or primer applied to the support.
- Detail the complete varnish system, specifying the brand of the isolation coat (if any) and the final varnish type (e.g., MSA Varnish with UVLS, Gamvar).
- Keep a log of environmental conditions if possible, noting any extreme temperature or humidity shifts during the painting process.
Armed with this chemical understanding, revisit your studio practice not with a set of rules, but with a new set of diagnostic tools. By mastering the science behind your materials, you can confidently build layers, control outcomes, and create more resilient, vibrant, and enduring art.